Submit your event
Our supporters can post their events on our community calendar.
If you're a supporter of Rockton-Roscoe News, we can arrange for you to post your event or announcement on our community calendar.
Your post could be seen by hundreds, even thousands, of readers in Rockton, Roscoe, and South Beloit.
We appreciate the financial support of our community members. Suggested levels start at $10 a month or $100 a year. Most businesses can afford to spend $25 a month or $250 a year. If supporting us is a hardship for you, let us know and we can make an exception.
So, if you'd like to submit events to our calendar, contact us at editor@roscoenews.com and we can set you up so you can log in or post at https://roscoenews.com/ghost/#/editor/post.
Note: content needs to follow our editorial guidelines, We require three items before your post can be published - feature image, post title, and post content. Put the date, time, and place in the excerpt, where it says "Add an excerpt." Once you're done, your post will remain as a Draft until one of our editors publishes it for you, usually the same day.
Step by Step Tips
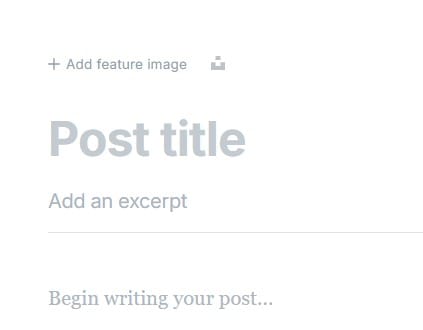
The image above show the three items (feature image, post title, and post) that you must add before your post can be published. The fourth item (the excerpt, with date/time/place) is strongly recommended.
Here's an example of a well-formatted calendar event: Spanish Conversation Club.
- First, add a feature image. At the top of the screen, where it says "Add feature image," click on the plus sign to upload an large, clear image from your computer or phone by Or if you don't have your own image, click the icon on the right to find a nice image from Unsplash. On our home page, horizontal rectangle images look best. Because if the image is too tall, the top and bottom will be cut off. But if your image isn't the right shape, you can crop it - see below.
- Add your post title - the name of your event. Our events use title case, capitalizing each word. Be specific, so people can find your event easier. Tip: the specific name of your event is not "Don't miss it!"
- Under "Add an excerpt," add the date, time, and location of your event. Add the information in that order - include the year too, because your announcement will live on Google forever. Example: Mon, Nov 11, 2024, 4 pm, Talcott Free Library, 101 E. Main St., Rockton IL, 61072
- Next, where it says "Begin writing your post," type a description of your event. You can add images too, though only text appears in searches. Say anything you want here, since you've already added the most important information under steps 1, 2, and 3.
- Your changes will be saved automatically. You can come back and make changes later from your Dashboard.
- You can find Advanced Tips below.
It is possible that your event could be seen by thousands of people in Rockton, Roscoe, and South Beloit, in Google searches, in AI answers, and even in Google News. We often feature events in our social media - also seen by thousands.
Cropping your image
Simple horizontal images work best as feature images, but you can crop them to make them simple and horizontal. Here's how:
- After you add your feature image, click or tap on it.
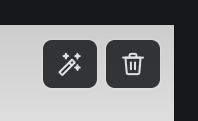
- In the upper right corner of the image, you'll see a magic wand and a trash can. The trash can is for deleting the image, if you want to add a new one. The magic wand is for cropping and editing.
- Click or tap on the magic wand and you'll see an edit screen. Three icons are at the top right: Rotate, Flip, and Crop Shape.
- Choose Crop Shape, the one on the right.

- You'll see a list of image ratios, starting with Custom and Square. The best choices are 16:10 or 16:9, at the bottom. Choose one of them.
- Once you choose 16:10 or 16:9, a horizontal window will appear over your graphic. Move your graphic within that window to choose the best part of your image.
- Once you're done, click on Save and Close in the upper right. Or click the left circular arrow to undo your last change.
If you have a poster or graphic with lots of text, it's better not to use it as your feature image, but to put that whole graphic into the body of your post. All that text in a thumbnail image will be hard to read on a phone, which is what most of our readers use. Unless you crop it and use only the simple, most eye-catching part of it.
Optional: you can help us out by making three optional changes on the Settings tab (the icon on the upper right). Otherwise, we can do it after you submit your event.
- Under Tags, choose a tag, usually the name of your town. You can add more than one tag, such as "Seniors," "Shopping," or "Sports." Don't use "Happenings" or "Events" as tags because it causes serious side effects. Trust me. I wrote the code.
- Change the Publish Date to one day ago or one week ago, so your event can appear in the Latest section but not as today's lead story.
- Under Code Injection, put your event date into the Page Footer as a four digit year, two digit month and two digit day - in that order. For example, Dec. 24, 2026 would be 2026-12-24.